


Under Construction
HAL interface electronics
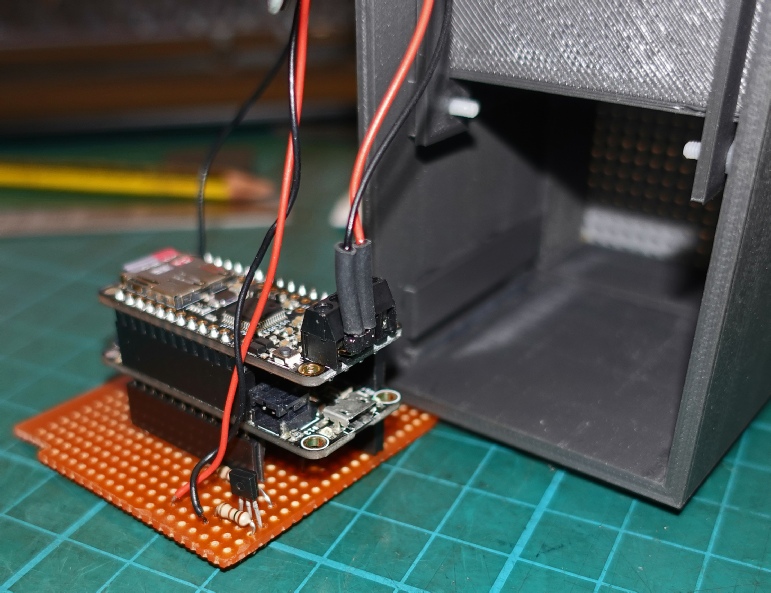
The electronics section of the HAL interface dies not require a tremendous amount of work. It consists of an Adafruit Feather M0 single board micro-
The circuit is so simple that I have not bothered to make a custom pcb. Instead, I am using a small piece of circuit strip board often known as Veroboard.
Solder two 0.1” pitch female header sockets to the strip board, one 12 pin, the other 16 pin. To cut the header, pull out one of the pins with a small pair of pliers and use a fine saw to cut though the plastic where the pin used to be. Something like an Xacto or similar saw used for model making is good for this.
You need to cut the tracks in between the rows of Feather pins. You can get a special tool for this but a 4mm drill bit mounted in a handle for ease of use just turned by hand in one of the holes in the strip board in the appropriate place will do the job.
The LED for the eye is soldered to a tiny piece of strip board fixed to the lens rear 3D print with a 2.5mm nylon nut and bolt. The connection is made using right angle 0.1 pitch male header and female header as shown in the picture left. I have used heat shrink to protect the wires where they are soldered to the female header. (I always use adhesive lined shrink tube.)
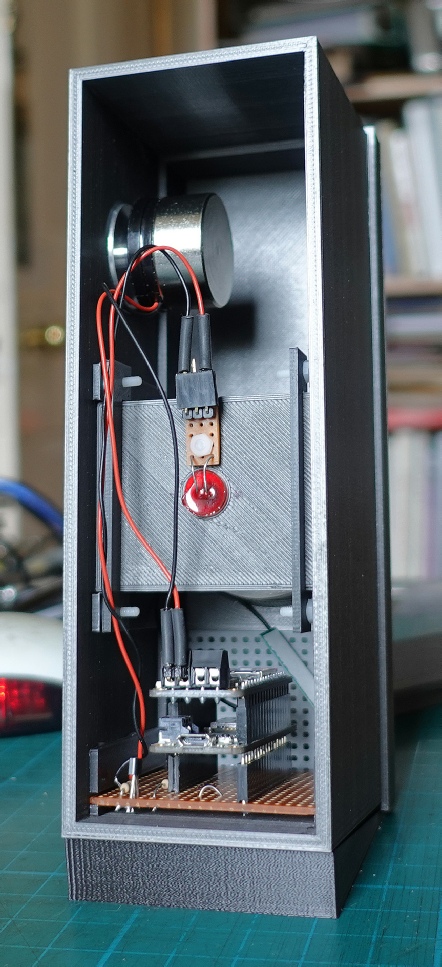
The device top left in the case is an Adafruit medium size surface transducer. This is in effect a loudspeaker which depends on the surface it rests on being vibrated by the transducer and hence vibrating the air in contact with it producing sound (as long as someone’s there to hear it!) As long as the surface it’s attached to is reasonably springy, the sound produced is surprisingly good (to my ears anyway). Putting the transducer on the body of an acoustic guitar, for example, produces a warm, rich tone. The 3D-
The amplifier on the Musicmaker is stereo. I don’t know whether it automatically mixes left and right tracks when only one speaker is connected but for this application it makes no odds. There is room in the case for a second transducer but at the time of writing, it is “out of stock” (shortage in time of plague? -
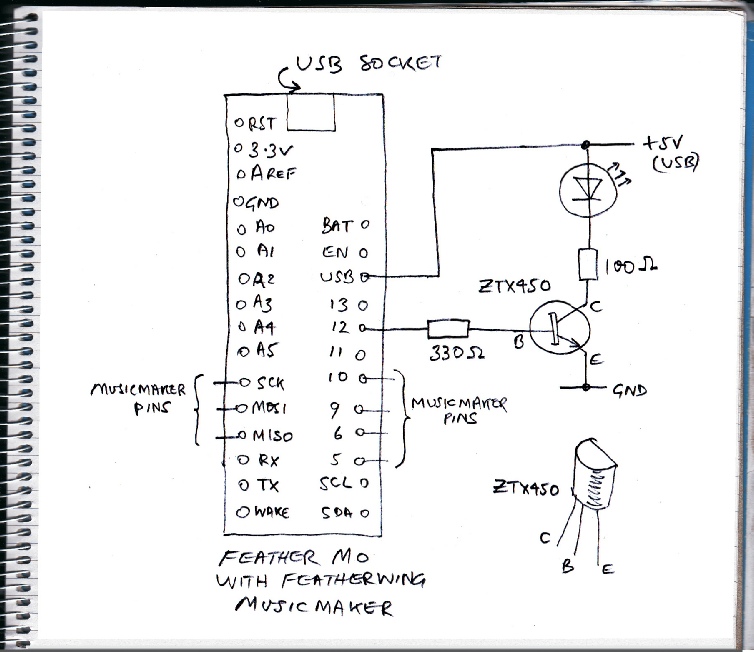
Above, behold the simplicity of the circuit! Seven pins are reserved for Musicmaker use, the rest are free and could be used to get inputs from, say, a motion detector or, as outputs, trigger all manner of stuff you might want to have done.
As mentioned in the introduction, the Feather could be controlled by WiFi or directly through serial via the usb port. At present the software randomly plays one of 36 clips with random gaps in between. At the same time the brightness of the LED waxes and wanes a little to convey extra “sentience”.
Left: the supplied terminals for the speaker wires do not retain small stranded wire well. I have soldered the wires onto right-

ZTX450 or similar transistor.

SD card containing mp3 clips.

Strip board slides in smple runners glued to inside of case.
Strip board

Circuit